![]()
![]()
![]()
![]()
![]()
![]()
![]()
|
|
|
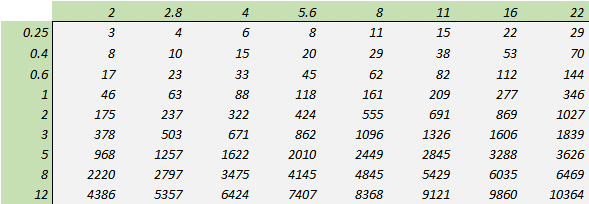
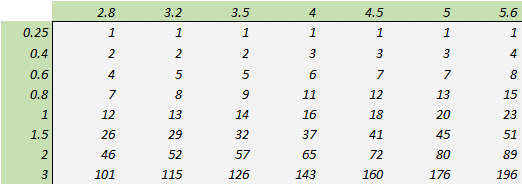
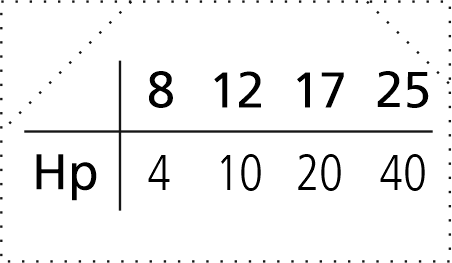
This is a second version of my attempt to define a simple way of estimating depth of field in photography. Version 1 was a little complicated and is described on the Single number DoF estimator page, with some possibly useful comments at the end on remembering the required details. Hopefully this is a simpler and more useful approach. Download the spreadsheet here. We know that depth of field (DoF) depends on the focal length of the lens, distance to the subject, lens aperture, and the circle of confusion. Photo Pills provides a handy chart on its Web site and a nice calculator app for a smartphone. If you have an internet connection or have no time pressure, great. On the other hand, sat at the table in the café wondering what aperture is needed to get a reasonably in-focus shot of your two companions as the birthday cake approaches, it is clear that this doesn’t help. Surely, I thought, there could be a simple number for a given lens which, with a little mental arithmetic, would estimate the DoF with acceptable error? Given a specific focal length, my idea is to have a simple parameter representing the depth of field at f/1 with the subject at 1 metre. From there, it should be simple to multiply up to the aperture in use and to the actual subject distance to get an estimate of the DoF. (Remember that subject distance is measured from the sensor, not the front of the lens.) Near DoF Plane OnlyGazing at DoF tables quickly shows infinity cropping up pretty promptly because the far DoF plane runs off to infinity with the sniff of a short lens or a stopped down aperture, while the Near DoF plane never does. So the first decision is that the simple parameter should estimate the near part of DoF only, and doubling or trebling it would then extend it to provide an overall DoF estimate (if the subject was nowhere near the hyperfocal distance). Linear in f, quadratic in distanceIt turns out that Near DoF varies as the aperture, more DoF the larger the f stop and hence the smaller the aperture, but also as the square of the subject distance, SD, much more DoF the further away the subject. A single parameter for Near DoF would need to be multiplied by the f stop in use and then multiplied twice by the subject distance to get an estimate of Near DoF. This is the theoretically calculated table of Near DoF for a 25 mm MFT(*) lens, that is, the DoF in front of the subject, for apertures from f/2 to f/22 and subject distances from 0.25 m to 12 m. For example, Near DoF at f/2.8 with the subject at 2 m is 237 mm: (*) MFT -- micro four-thirds. A sensor format mainly promoted by Olympus and Panasonic. The spreadsheet accommodates any sensor format, with preset values for APS-C and 35 mm full frame.
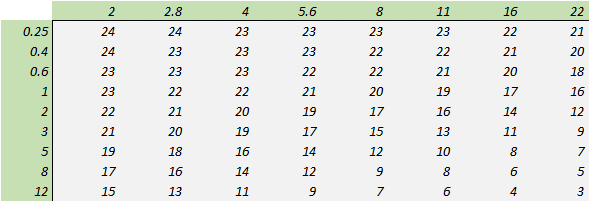
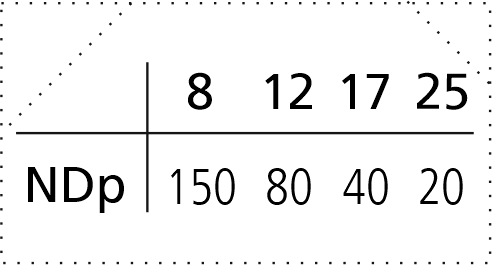
This is the table where Near DoF is expressed as per aperture f and per subject distance squared, that is, Near DoF when f=1 and SD=1:
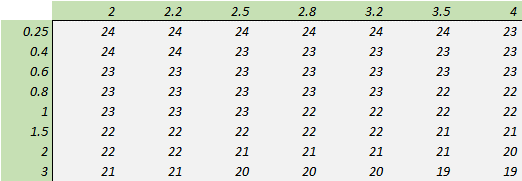
The values range from 3 to 24, which does not suggest a constant value for the parameter. Restricting the table to use cases of particular interest, however, gives a much better impression. This is a table of values oriented towards close-up photos with significant bokeh, that is, apertures from f/2 to f/4 and subjects placed between 0.25 m and 3 m. The values range from 24 to a much more reasonable 19:
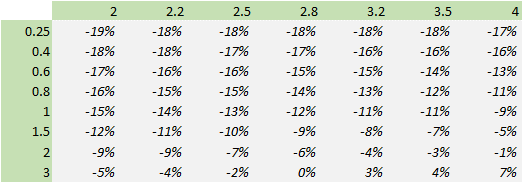
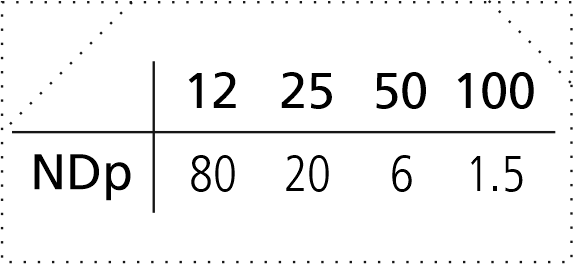
The average of these values, 22.2, seems quite promising as a single value estimator. The important question is, just how accurate is it? AccuracyThe first step is to define how to measure and express the error in any estimate of DoF. “Relative error” is a measure of accuracy relative relative to the size of what is being estimated or measured. For example, if the actual DoF is 93 and an estimate suggests 80, the error is -13 and thus the relative error is -14%. If the actual DoF is 561 and the estimate suggests 640, the error is +79 but the relative error is still similar at +14%. The next step is to decide on relative to what. For example, we might consider an error of 53 mm in a DoF of 93 mm to be less important if the estimate was 146 mm, but more important if the estimate was 40 mm. In engineering terms, this is the same magnitude of error, +57% or -57%, relative to the true value, but maybe not in subjective terms. The error might be better related to its estimate rather than to the 'true' value, in which case the error would be +36% when the estimate was larger than the true value, but -133% when less. This approach to relative error might be called perceptual and is the one used in this analysis, where the reported relative error is relative to the smaller value of true DoF versus estimated DoF. The practical effect of this is to report relative errors as the larger of the errors relative to true DoF versus estimated DoF, that is, it is the worst case scenario which is always taken to represent how good, or how bad, the estimates are. Now that we have defined relative error, as above, as the way that we'll measure errors, the question of accuracy can be broken down into three related but distinct questions. One is a question of the maximum error that might be seen in a set of estimates. Often it is thought important that the maximum is as small as possible. In game theory, this is known as the MiniMax principle -- always seek to minimise the maximum error. Two is a question of the balance of the errors. Here, it might be important to know whether there are more underestimate errors than overestimates (or vice versa), or that overestimates are balanced by underestimates. And three is a question of just how large the errors are "on average". Maximum ErrorThe maximum error in a set of estimates is easily determined by finding the largest value. Computationally, this requires ignoring the sign of the error, since an error of -30% is arithmetically smaller than an error of +3% and a spreadsheet will happily tell us that 'MAXIMUM (-30, 3)' is 3. Balance of Errors – 'ordinary' averageThe balance of errors is given by their arithmetical average. If the average error is close to zero, the set of errors are balanced -- the magnitudes of the under-estimates are as large as those of the over-estimates. If the average is negative, then underestimates predominate, and overestimates predominate with a positive average. The spreadsheet tells us, for example, that 'AVERAGE(-30, -30, 3, 3)' is -13.5. This negative average tells us that underestimates are larger than overestimates on average. On the other hand, 'AVERAGE(-30, -3, 3, 30)' is 0. There are some pretty large errors in the second set of values, but their average is 0, and hence the underestimates are perfectly balanced by the overestimates. Average Error – RMSIn calculating the 'ordinary' average of the errors, we saw that very large overestimates could be balanced by very large underestimates, leading to a very small average error which masks errors of very large magnitude. A common (engineering) approach to measuring 'true' 'average' error is RMS (root mean square). Here, the errors are first squared, their average calculated, and then the square root taken. This gives a measure of the general absolute size of the errors and is the 'average' we are seeking when we need to know whether errors are generally large or small. RMS has some other useful properties as well. In particular, it gives proportionately greater weight to larger errors. For example, 'RMS (-12, -2, 2, 12)' is 8.6, while 'RMS (-7, -7, 7, 7)' is 7.0. The sum of the various errors is the same, 28, but it is made up of some larger and some smaller in the first case, and all medium in the second. The larger RMS value signals the presence of larger than, ah, 'medium' errors. Single Parameter in useIn use, a single value parameter for Near DoF of 22.8 is not much help when a quick calculation is needed while sat in the café. It needs to be a nicer and rounder number for mental arithmetic, and a value of 20 suggests itself. This is the table of relative errors in the estimated Near DoF using a value of 20 for the NDp parameter:
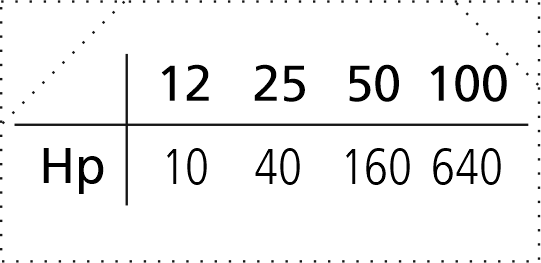
For the given use cases and rounded parameter, this is the summary of the accuracy:
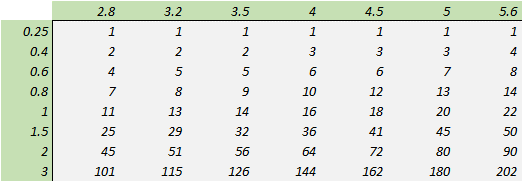
Broadly speaking, these are very good results. The next nicely rounded number for NDp would be 25, and the accuracy summary for this value shows that the balance of errors changes from 11% underestimates to 13% overestimates, with a slight increase in RMS error to 14.5% and a larger increase in the maximum error to 34%. The key driver of accuracy in practice, however, is not the rounded NDp parameter, but my ability to estimate the subject distance of my two companions. If I guessed 1 m instead of 1.5 m with the lens at f/2, I would estimate Near DoF as 40 mm instead of 90 mm, an uncertainty much larger than the nominal errors of 6 mm or 11 mm due to a rounded NDp parameter for those use cases. The relatively simple fix for this is to read subject distance off the lens by going to manual focus for a moment. Olympus 'Pro' lenses have a manual focus clutch, making this even easier. Example of macro use casesNear DoF using the Olympus 60/2.8 Macro for close-ups between 0.25 m and 3 m and apertures between f/2.8 and f/5.6 is calculated from theory as:
That is quite a range of Near DoF, from no more than 1 mm at f/2.8 (well, those values of "1" for the closest subject are rounded up, DoF there may actually be around 0.2 mm at f/2.8) for the subject at 0.25 m up to 196 mm at f/5.6 for a subject at 3 m. The spreadsheet suggests NDp = 4 for these use cases. If we use NDp = 4 to estimate Near DoF, the values are:
What is interesting is how well the estimated Near DoF values seem to match the 'true' values. The worst case, as might be expected, seems to be the estimate of 202 mm instead of 196 mm for the subject at 3 m with f/5.6. The spreadsheet tells the accuracy of these estimates overall:
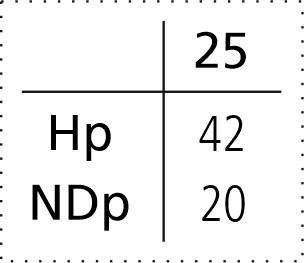
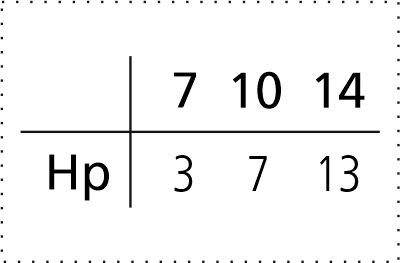
Excellent agreement! Example of the birthday partyWe are in the cafe with our MFT camera and we have mounted the Olympus 25/1.2 lens in anticipation of low light and good bokeh. The spreadsheet tells us that NDp = 20, that is, the Near DoF for the lens is 20 mm with the subject 1 metre away at f/1. Case 1: SD = 1.5 m, f/1.2, what is Near DoF? We're wondering what the Near DoF is for a head shot of our friend who is 1.5 m away with the lens wide open at f/1.2. OK, that's 20 x 1.5 x 1.5 x 1.2 = approx 50 mm. Is that good enough? Well, with luck we'll focus on the eye nearest us, and very roughly the tip of someone's nose is probably 40 mm in front of their eyes. Very roughly, someone's ears are probably around 40 mm behind their eyes, so yes, we seem to be in with a good chance here since our estimated Near DoF is 50 mm, and also therefore Far DoF is at least 50 mm behind. (If 1.5 x 1.5 x 1.2 doesn't seem like a fun exercise, then we can just go with 1.0 x 2.0 x 1.0, that's good enough for the estimate we need.) Case 2: SD = 1.5 m, Near DoF = 150 mm, what is f? But our friend has put on their fancy dress hat, we guess it must be 300 mm round, and we'd like all of that in focus. We decide that we are looking for Near DoF of 150 mm, therefore, and we are wondering how far we need to stop down to get that. Well, the Near DoF at f/1 due to our subject distance is 20 x 1.5 x 1.5 = 45 mm (we did that a moment ago), so to stretch 45 to 150 we need f/3.2 or so. Again, if 150 / 45 isn't in our repertoire, then 150 / 40 or 150 / 50 will do fine instead, we'll immediately know the answer is around 3 or more, so we need to set the aperture to f/3.2 or f/3.5. Case 3: f/1.8, Near DoF = 150 mm, what is SD? Finally, the lighting isn't wonderful and we really do not want to stop down beyond f/1.8, so we decide to get off the chair and back away a little so the hat will be in focus at f/1.8. We are wondering how far back we need to go. Well, here the Near DoF is 20 x 1.8 = 36 mm per squared subject distance. We guess that 150 / 36 is something around 4, which is the desired subject distance squared. So the needed subject distance is 2 m. It turns out we don't need to back up too much. These examples show how the simple Near DoF parameter allows us to estimate Near DoF for a given f stop and subject distance, but also to estimate the needed f stop for given Near DoF and subject distance, and to estimate subject distance for a given f stop and desired Near DoF. Some technicalitiesDepth of field is that region in an image which seems to be in acceptable focus. All images are more or less blurry (!), and the issue is how much blur is acceptable. The depth of field in a particular photograph depends on the focal length of our lens, the aperture, and subject distance. It also depends on our visual acuity and the viewing conditions. And it also depends upon our camera's sensor. In order to estimate the DoF in an image, some assumptions are made (**). First is that we have good eyesight and we are able to distinguish 5 line pairs per mm (lp/mm) when viewing an image 25 cm from our eyes. Second is that the image which can be comfortably viewed at a distance of 25 cm is no larger than a conventional 8 x 10 print, that is, around 200 mm x 250 mm. Third is that the camera output is enlarged to get an 8 x 10 print, and that if we have a camera with a smaller sensor we are going to enlarge the output more than we would do if the camera sensor was larger. Putting these three assumptions together results in a technical measure called the 'circle of confusion', which relates tolerable blur (the depth of field) to the camera sensor. For example, CoC for a 35 mm full frame sensor is 0.029 mm, while for APS-C it is 0.018 or 0.019 mm, and for MFT it is 0.015 mm. One way to think of CoC is as a measure of the size of the sensor dot that you will see as being just in focus in the 8 x 10 print. Because dots from the MFT sensor will be enlarged almost twice as much as dots from a 35 mm full frame sensor, the MFT CoC is half the size of the FF CoC. (** Wikipedia has useful articles which explain these technicalities in more detail.) More technical uses for NDpCase 4: We want sharper/softer prints, what is NDp? We are back at our party with our 25/1.2 lens and its NDp of 20. We think we'll print one of our nice snaps on canvas, and can relax our demands upon the region in acceptable focus. NDp is linear in CoC, so if we think we're happy to double the CoC (we don't mind a little more blur) then we'll double NDp, so we can now snap away using a NDp of 40 when deciding upon the Near DoF we want, the aperture we'll shoot at, and the distance to the subject. Or, we'll change our mind and want a very crisp glossy photo print. We'll halve our CoC intention (we want less blur) and so we'll use a value of NDp of 10. Case 5: We will need to crop, what is NDp? We are a little way away from the action and wish we had brought our 12-100/4 zoom lens. There are some snaps we'd like to take that we guess will need a 50% crop, equivalently that will need to be enlarged by 2x. This is the same thing as wishing we could take shots at 50 mm focal length. NDp is inversely quadratic in FL, hence the depth of field at 50 mm is one-quarter that at 25 mm, so now NDp = 20 / 4 = 5. We can snap away with NDp = 5 in mind if we are confident we'll have to crop. Case 6: What about full frame? We have lingering full frame envy (yes, it's a thing for MFT and APS-C shooters) even though our 25/1.2 gives us all the bokeh we ever wanted, and we are idly wondering just what a full frame 50/1.8 would bring to the party. The spreadsheet tells us that NDp = 10 for a 50/1.8 lens imaging onto a FF sensor. (We could have arrived at the same conclusion by remembering that MFT is approximately a 2x crop factor of FF, or equivalently, that the MFT CoC is approximately half that of FF.) OK, here comes the candled cake, we have a FF system, our friend is 1.5 m away and the 50/1.8 lens is wide open. Near DoF is 10 x 1.5 x 1.5 x 1.8 = approx 40 mm. Huh, our MFT 25/1.2 gave us 50 mm.... Our envy dissipates. Hp -- the hyperfocal parameterThe party moves outside. Our DoF interest changes, we now want everything in focus. The spreadsheet tells us that Hp for the 25/1.2 is 42. That is, the hyperfocal distance (***) is 42 metres at f/1. (***) Hyperfocal distance, HD, is that point where everything behind is in focus, that is, Far DoF runs to infinity. Case 7: What is Far DoF? The spreadsheet also tells us that HD is inversely linear in f, so a little mental arithmetic reveals HD is around 10 m at f/4. Great, everything beyond 10 m will be acceptably in focus. What about the Near DoF? NDp is 20, subject distance is 10, f is 4, Near DoF is thus approx 8000 mm or 8 metres, ie acceptable focus starts from about 2 m away. To avoid disappointment, if we want to stay with f/4, we can halve CoC to change what we think acceptable, so we double Hp and halve NDp to 84 and 10. (Of course, we can go to f/8 instead.) This suggests HD is around 20 m, and Near DoF approx 16 m, ie acceptable DoF starts around 4 m away. Case 8: What SDs for a focus stack? We may want to construct a focus stack, so we'll take a second snap at 4 m, where we'd estimate Near DoF is now 640 mm. If we wanted even closer foreground in focus, well, our third snap would be at 3.35 m (for 50% overlap), our fourth at 2.8 m, and our fifth at 2.3 m, all calculated using NDp = 10 and f/4 with subject distance at the successively closer points of 50% overlap of Near DoF. Remembering NDpI stick a note on my lens hood, printed on a Brother 'P-touch' using 24 mm wide laminated tape in white text on a clear background, code TZ-155. It shows up nicely on a black surface.
I've made up some PNGs for popular Olympus lenses that can be used with Brother's P-touch Editor software. Right-click and save the image. These two are for the 12-100/4. They need to be trimmed down to fit onto the 12-100 lens hood.
These two are for the 8-25/4. They also need to be trimmed to fit onto the lens hood.
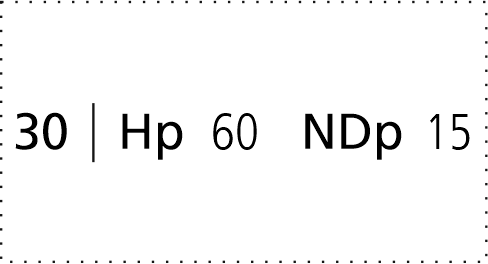
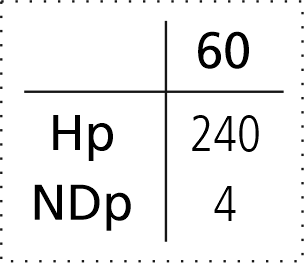
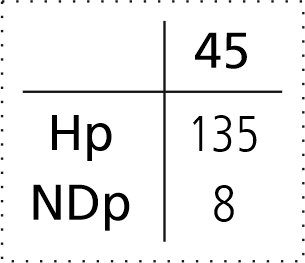
This one for the 30/3.5 Macro needs to be trimmed right down so it sticks onto the lens barrel, there is no lens hood. No such problem for the 60/2.8 Macro.
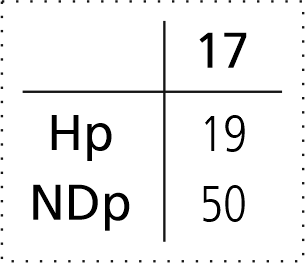
These three are for the 17/1.2, 25/1.2, and 45/1.2.
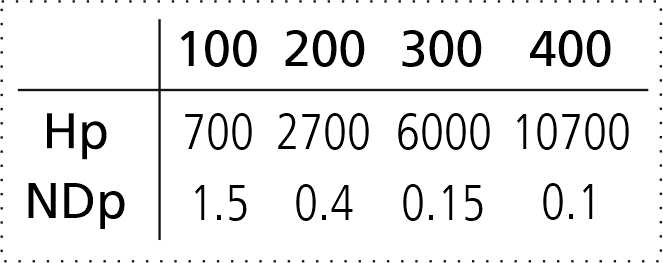
This is for the 100-400/5-6.3 telephoto zoom.
Two for the 7-14/2.8 or 7-14/4. Trimming to fit the lens hood may be needed.
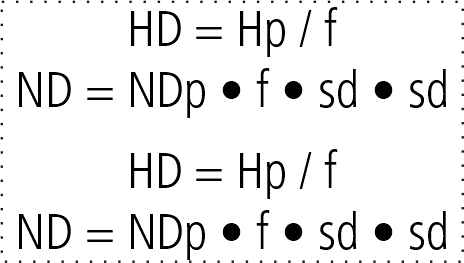
Finally, I also put the formulas on the hood somewhere. This is a two-up, cut the 24 mm wide print in half to give two for two lenses.
|
|
©2024 Lester Gilbert |