![]()
![]()
![]()
![]()
![]()
![]()
|
|
|
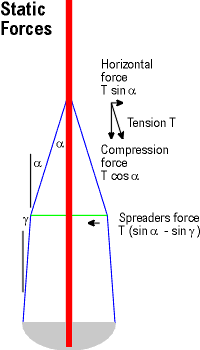
The diagram shows the various rig heights, hull beam, and spreader lengths we have to play with. For my Ikon with hounds about 200mm below the jibstay attachment, these distances are (in mm) roughly: H=1400, H1=600, H2=600, H3=400, HJ=200, B2=80, B1=110. There are a number of questions that are interesting to ask: where to place the hounds, where to place the spreaders, what kind of tension to put into the shrouds, what should the length of the spreaders be, and so on. We will try to get some approximate answers by considering what happens when the sail forces deflect the mast laterally by a small amount. We're going to be talking about lateral mast bend here almost all of the time. Mostly, I'll say "lateral mast bend", but sometimes, if I just say "mast bend", you should read it as "lateral..." Once or twice I'll talk about fore-and-aft mast bend, but I'll always be specific and I'll always say "fore-and-aft...". We may consider that the lateral mast bend is constrained at two points -- the mast step, and the hounds. If the mast is deck-stepped, the mast is free to pivot at the step. If the mast is keel-stepped, and if the mast partners at deck-level are sufficiently loose to allow the mast to bend laterally between step and hounds, the mast is also free to pivot at the mast step. In these two cases, the height H is the distance between the mast step and the hounds. If the partners hold the mast firmly with a keel-stepped mast, though, they are a constraint upon the lateral bend of the mast, and the mast is effectively gripped as a cantilever at deck level. The height H is then taken as the distance between the hounds and the mast partners at deck level. The (static) constraint upon the lateral mast bend at the hounds is an awkward one to analyse simply. We shall consider it below, after we have identified the dynamic lateral forces acting on the mast. For the time being, though, it is important to note that the hounds are the pivot about which the mid-mast and the upper mast bend. The force acting at the spreader is T(sin alpha - sin gamma), where T is the tension in the shrouds, and the angles alpha and gamma are as shown on the diagram, being the angles made by the shrouds with respect to the mast as a result of the ratio of the spreader length B2 to the hull beam B1. Notice that if the spreaders do not actually deflect the shrouds as they run from the hounds to the chainplate, then the angle gamma equals the angle alpha, and so the spreaders offer no initial lateral force upon the middle of the mast. The picture of the static forces should help here.
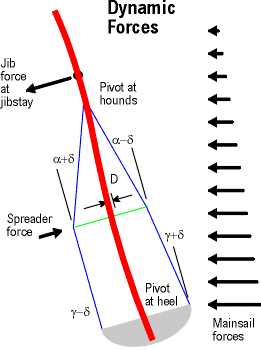
When the mast is loaded by the sail forces, we must first consider what happens to the shroud tensions and rig geometry as the boat heels. The picture showing the dynamic forces should help here. When the boat heels, the windward shroud tensions up. Because of this, the windward spreader tends to be forced into the mast, and thus contributes to any mid-mast lateral bend, pushing the mid-mast to leeward. When the boat heels, the leeward shroud slackens, and so the leeward spreader is weakened in the resistance it offers to the sag of the mid-mast to leeward. The windward shroud tensions up in direct proportion to the forces on the sails, and, what is the same thing, in direct proportion to the righting moment of the keel ballast. Very roughly, given a bulb of 2.5kg at about 400mm from the centre of buoyancy, a heel angle of 20 degrees suggests that the extra tension needed in the windward shroud to support the heel is about 2kg if we assume the hounds are 1300mm above CB, and the shrouds form an angle, alpha, of 7.5 degrees to the mast at the hounds. (Yes, we should really be looking at the metacentric height for these calculations, but the extra precision introduced is not really necessary at this point.) For the 0.6mm diameter 7-strand stainless steel wire used on my Ikon shrouds, an increase in tension of 2kg is achieved by 3 turns of the bottlescrew, which is a M3.5 screw with a 0.7mm pitch; that is, the shrouds have lengthened by about 2.1mm. This increase in shroud length makes very little difference to the rig geometry, implying that the hounds themselves will sag to leeward by about 0.3mm. Now, we can get around to considering the lateral mast bend. We will approach this in two parts. First, we will look at the mid-mast bend, between the hounds and the mast step (or partners if the mast is clamped there). Second, we will look at the upper mast bend, above the hounds. Then, we will put our findings together to see the whole picture. We begin with the mid-mast lateral bend. As a result of the mainsail forces, we imagine that the mid-mast sags to leeward by a small amount, D. This sag will cause the angles made by the shrouds with respect to the mast to change by a very small amount we shall call delta. To get a feel for this change, imagine that the mid-mast sags by 3mm, and that the distance between hounds and spreaders is 600mm (H2). The shroud angle would thus change by about 0.3 degrees, so a windward shroud angle (alpha) of 7.5 degrees would become 7.2 degrees (alpha - delta), and the leeward shroud angle would rise to 7.8 degrees (alpha + delta). The mid-mast sag also tends to stretch the leeward shroud a little (ignoring all other effects for the time being), and hence increase its tension, while the windward shroud slackens to a lower tension. The length of the leeward shroud between the spreader and the hounds can be estimated, using Pythagoras, to be approximately 605.3mm if we assume our spreader is 80mm (B2) long. The mast sag of 3mm (D) increases the "effective" spreader length to 83, and hence the length of this section of the shrouds increases to about 605.7mm, an increase of about 0.4mm. A similar increase in shroud length would be experienced below the spreader, from the spreader to the chainplate, to give a total increase in shroud length of about 0.8mm. As we saw earlier, this is equivalent to just over one turn of the bottlescrew, or about 0.7kg in increased shroud tension. The shroud angle between the spreader and the chainplate we have called gamma, and is about 2.9 degrees given the dimensions we are using. The actual force then offered by the spreaders to counteract the mid-mast sag is given by the difference between the leeward spreader force T[L].(sin (alpha+delta) - sin(gamma-delta)) and the windward spreader force T[W].(sin (alpha-delta) - sin(gamma+delta)). If we had tensioned the shrouds to about 4kg on the shore (that's quite a high tension, by the way), then T[L] is about 4.7kg, T[W] is about 3.3kg, and the difference between the leeward and windward spreader forces is about 0.42kg - 0.23kg, or about 0.2kg. (Not much. It seems the main virtue of the spreaders is provide a sufficiently large alpha at the hounds to support the whole rig when heeled, rather than to offer real support to the mid-mast.)
There are some interesting points to make here. First, both shrouds lose tension very slightly when the mid-mast bends, because this bend slightly shortens the distance between hounds and chainplates. As a result the spreaders lose effectiveness slightly, more so as the mid-mast bends more. Very approximately, we might estimate that a 3mm mid-mast sag decreases the distance between hounds and chainplates by about 0.01mm, causing a loss of tension in the shrouds by about 10g; not much at all! Second, given that the mid-mast mainsail forces tend to cause the mid-mast to sag or bend to leeward, this bend below the hounds also tends to force the mast-head to windward, into the wind. We will see in a moment how this is counteracted by the forces on the upper mast. Third, let us estimate the mid-mast mainsail forces we are dealing with. We said earlier that the boat was heeling by 20 degrees, and hence an extra 2kg loading was being applied by the sailplan. The mainsail's share of the sail area in the No.1 suit of an IOM is approximately 3460 sq.cm to the jib's 2500 sq.cm, about 58% of the total sail plan, so the mainsail is causing about 1.2kg of this loading. Then, if we take the proportion of the mainsail's area below the hounds to be about 80%, this gives us about 1kg to be resisted by the leeward spreader/leeward shroud on the one hand, and mast stiffness on the other. Finally, we have established that, ignoring all other forces, mid-mast sag tends to tension the leeward shroud and slacken the windward shroud. However, there is another force that cannot be ignored, the force that causes heeling, and hence the tensioning of the windward shroud and the slackening of the leeward shroud. We may be quite sure that, overall, the leeward shroud slackens off more than it tightens up. The reason for this is that the heeling force is larger, being generated by both jib and mainsail, while the force tending to produce mid-mast sag is generated by only a part of the mainsail. Using our example figures so far with the boat heeled at 20 degrees, the total force of jib and main being resisted by mast stiffness and the tension in the windward shroud is 2kg, while the force due to that part of the mainsail below the hounds is about 1kg. In resisting mid-mast lateral sag, the spreaders depend upon the leeward shroud having a higher tension than the windward shroud. This is never the case; the leeward shroud must always have lower tension than the windward when the boat is heeled. The windward spreader will act to actually induce mid-mast sag rather than resist it, while the leeward spreader's ability to resist this mid-mast sag is reduced. We saw earlier that, ignoring heel, the leeward shroud needs to tension up by about 0.7kg and this provides about 0.2kg of support to the mast at the leeward spreader. Against this, we might imagine that the windward shroud would tension up by about 1.6kg (we'll see how to calculate this later), and in fact cause about 0.3kg of force to push the windward spreader into the mast, easily overcoming the 0.2kg of support found earlier. Now we consider the upper mast lateral bend. The forces on the mainsail are quite modest here, unless the hounds are positioned extremely low down. The upper mast forces are mainly determined by the jib and jibstay. When the mast is loaded by the jib, the jib force acts through the jibstay. The effect of the increased load on the jibstay is to both bend the mast in the fore and aft direction, just as though extra backstay tension was being applied (which, of course, it is because of the increased jibstay tension), as well as to pull the mast head to leeward. The mast head sag to leeward is induced partly by a component of the jibstay force pulling the mast to leeward, and partly by the area of the upper part of the mainsail pushing the head to leeward. By tending to make the upper mast sag to leeward, these upper mast forces also tend to flex the mid-mast below the hounds to windward, into the wind. At the upper mast, we imagine that 20% of the mainsail area is acting above the hounds, providing about 0.2kg of force. We may consider this force as acting about 1/3 of the way above the hounds to the top of the mast, perhaps 130mm. 100% of the jib sail area is acting on the jibstay, a force of about 0.8kg. As we saw earlier, part of this force is acting to tension the jibstay, and part is acting to pull the masthead over to leeward. We may estimate that the component of the jibstay force acting to pull the masthead to leeward is a function of the jib sheeting angle; the tighter the sheeting angle, the higher the force. If we take a jib sheeting angle of 15 degrees, then about 0.7kg is pulling the mast head to leeward (0.8 x sin (15); and about 0.2kg is tensioning the jibstay and hence tensioning the backstay, 0.8 x sin(75)), acting through the jibstay attachment point, 200mm above the hounds.
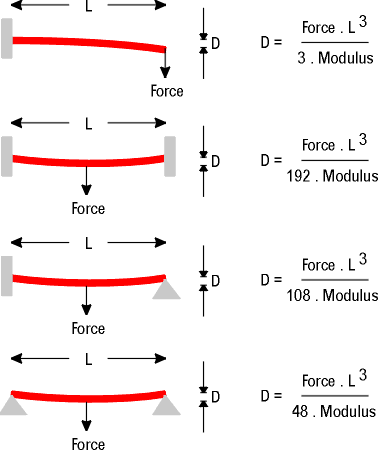
The only resistance to upper mast sag is provided by the stiffness of the mast itself. It is now time to estimate mast stiffness, so we can then estimate the amount of upper mast sag. The first task is to calibrate our mast. I clamped my 11.1mm dia groovy section mast so that 1000mm was projecting horizontally from the clamp, forming a cantilever. I then hung various weights from the end, and measured the deflection. It turned out that the deflection was about 20mm per 100g of loading. The formula for this kind of cantilever deflection is equal to Force x (Distance raised to the third power) divided by 3 times the mast modulus, as given in the diagram opposite. It is the mast modulus we are needing, and it turns out to have a value of about 1.7 provided we measure the distances in metres and the weights in kg. So we have 0.2kg acting at 0.13m, with 0.7kg acting at 0.2m. Given a modulus of 1.7, this suggests the upper mast sags about 2mm at the mast head -- a very modest sag indeed -- as long as we consider the hounds to be cantilevered. When the mid-mast and upper mast forces are evenly balanced, the upper mast is cantilevered at the hounds, as is the mid-mast. But the mid-mast forces are usually larger than the upper mast forces, and so the hounds are partly a cantilever, and partly a pivot. If the constraint on a beam is a pivot, rather than a cantilever, the formula for the deflection changes so as to allow more deflection; a beam is held stiffly by a cantilever constraint, but is merely supported by a pivot constraint. Roughly, the cantilever holds the mast twice as stiffly as a pivot. Further, the mid-mast deflection is also affected by the constraint at the mast partners. If the partners are loose, the mast is pivoted at the mast step, but if the partners clamp the mast, we have a cantilever, and, very roughly, cantilever partners hold the mast twice as stiffly again. The actual formulas are given in the diagrams. Let us re-calculate the mid-mast sag that we earlier suggested was 3mm. We have the lower part of the mainsail acting upon the mid-mast. To simplify things, we may consider that the lower mainsail force of about 1kg is acting halfway between the hounds and the mast partners. If we take it that the partners have clamped the mast, while the hounds form a pivot with respect to the mid-mast, the calculated deflection is about 10mm. This calculation assumes, however, that there are no other supports for the mast, but this assumption is incorrect. On the one hand we have the shrouds and the spreaders, and on the other we have the upper mast forces which are counteracting the mid-mast sag. Our 2mm deflection at the top of the mast, caused by the upper mast forces, is the equivalent of about a 3mm counteracting deflection at mid-mast, so our mid-mast deflection is now down to 7mm. Equivalently, we may consider that our mid-mast mainsail force has been reduced from around 1kg by about 7/10, or down to about 0.7kg. Then, considering the leeward shroud, the extra tension caused by a 7mm deflection of the mast at the leeward spreader elongates the shroud to about 606.3mm, or about 2mm both above and below the spreader. This increases the tension in the leeward shroud by about 1kg, and the net effect is that the leeward shroud then provides a mast supporting force of about 0.4kg. Equivalently, we may consider that the mid-mast force is now down to about 0.3kg, and a re-calculation suggests that this gives a mast deflection of about 3mm. Phew. That's what we thought in the first place...
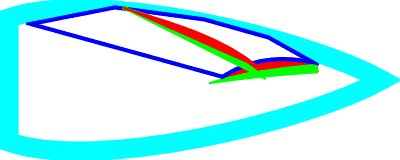
Now that we have run through these calculations, it is worth checking to see what all the fuss is about. After all, we have uncovered rather small lateral mast deflections -- say, 2mm at the top of the mast, and 3mm in the mid-mast -- and it hardly seems worth all the effort. The diagram shows us looking down from the mast head, towards the light blue deck, of a boat rigged with a single dark blue mainsail. On the one hand, we show a green mast, upright, and the same mast, laterally bent, in red. We have a green aerofoil shape, the shape of the sail when the green mast is upright, and we have a red aerofoil shape, being the shape of the sail when the red mast sags. The effect upon the sail of a sagged mast (that is, laterally bent to leeward) is to reduce its effective twist. The luff of the mainsail has rotated away from the apparent wind. WB Sails has an excellent page on the topic. If the mast has sagged to leeward by 3mm at the mid-mast, and the sail chord there is about 240mm, the sag has changed the angle of attack by under one degree. Well! I was going to make a spreadsheet to do all these calculations for a variety of spreader lengths, positions, and tensions -- but now I'm not; it doesn't seem it's worth it... (You will also have noticed that we have gone around in a bit of a circle while trying to estimate mast sag. We started by assuming a mast sag of 3mm, and used that to estimate that the mast sag was about 3mm -- hmmm... In fact the calculation of mast lateral bend is astonishingly complex, and I'll take any excuse not to have to work up a spreadsheet for it.) That the effects of lateral mast bend are, in all probability, very modest is a conclusion that only really applies to the particulars of the rigging arrangements we've been looking at -- my Ikon. Specifically, we have considered a keel-stepped mast with a clamp at the mast partners some 150mm above the keel step. This arrangement is far stiffer than a mast without effective partners, by a factor of at least 2. In other words, a deck-stepped mast with no effective mast partners would theoretically allow, say, over 20mm of mid-mast sag, that would only be offset by 3mm of upper mast counter-bend and equally modest resistance by the leeward spreader. The net result might be a mid-mast sag of, perhaps, 13mm instead of the 3mm as estimated. Such a sag is far more serious, yielding a reduction of twist of around 5 degrees. Conclusion? If lateral mast bend concerns you, set up some effective mast partners; they'll do far more for you than any amount of messing about with spreader location. Another conclusion? If you have effective mast partners, you really can go down to a thinner, lighter mast. Final conclusion? You may not need spreaders at all, particularly on No.2 and No.3 suits where windage becomes a significant factor. Recall that while spreaders increase angle alpha (from around 5 degrees to about 7.5 degrees with the dimensions used above for the No.1 suit), and thus help support the mast better when the boat is heeled (50% more support), the windward spreader also almost always pushes the mid-mast to leeward during heeling actually causing lateral mast sag (unless counteracted by very low hounds, in which case you'll get serious upper mast sag that can't be counteracted). It seems you can easily eliminate the spreaders and increase shroud tension by 50% to compensate; but make sure your hull can withstand the increased compression loads, of course. The only other comment that may be worth making is that the spreaders are essential devices to control fore-and-aft mast bend if you don't have an effective mast ram. Again, the Ikon mast ram is an especially powerful device, located at the partners 150mm above the mast step, and therefore able to exert tremendous leverage across the whole range of backstay tensions from around 0.5kg up to 4kg. I don't bother with messing about with chainplate locations or spreader angles any more. But if you don't have an effective mast ram, you'll need to give yourself a range of chainplate locations, and experiment with a range of spreader angles (bending them in a "V"), to get the right fore-and-aft mast bend. (Your mast ram is located 60mm above the mast step? It is really just acting as a mild support, and is rather unlikely to be able to induce any significant fore-and-aft mast bend.) (Mikel Zatarain has developed a very sophisticated mathematical model of the mast/shroud/spreader arrangements. It seems to suggest broadly similar conclusions to those mentioned above, but also may have more to say about pinning the spreaders to the shrouds, and locking the spreaders to the mast. We'll report on this "real soon".) But something interesting has come out of this. We have seen that the increasing tension in the jibstay, part of which is caused by heel, also causes the mast to bend fore-and-aft. The result is to flatten the head of the main and to increase its twist. On my Ikon, an extra 0.2kg of jibstay, ie backstay, tension is enough to add something like 3 degrees of twist to the top of the main. But fore and aft mast bend is going to have to be another page. 2005-12-18 |
|
©2025 Lester Gilbert |